PHP is a vital coding language for WordPress users. Even if you’re not a developer, you may still need to understand a little about it in order to maintain your site. However, if you don’t know where to look, finding even the most basic PHP information for your WordPress installation can be tricky.
Fortunately, if you care to take a few minutes to set it up, you can create a single page where you’ll find all the PHP information you need. Even better, it only takes a single line of code to do so.
In this post, we’ll introduce you to the phpinfo() function and explain why it may be useful to you. Then we’ll show you how to use it to create a phpinfo page for your WordPress site.
An Introduction to the phpinfo() Function
phpinfo() is a PHP function or a snippet of code that takes in one or more parameters and returns a value. Running phpinfo() will display information regarding your site’s PHP configuration, including:
- The current version of PHP your site is running.
- Your server information and environment.
- The PHP environment.
- Your Operating System (OS) version information.
- Paths, including the location of php.ini.
- Master and local values for PHP configuration options.
- HTTP headers.
- The PHP License.
- PHP Modules and extensions currently in use.
Using the function alone will return all available information. However, there are also a handful of parameters you can use, in order to access only the specific information you want to see. These include:
INFO_GENERAL: Displays the configuration line, web server, OS, and more.
INFO_CREDITS: Shows a list of PHP developers, modules, etc.
INFO_CONFIGURATION: Returns the current local and master directives.
INFO_MODULES: Shares all extensions and their settings.
INFO_ENVIRONMENT: Includes all environment variable information.
INFO_VARIABLES: Shows all predefined variables from Environment, GET, POST, Cookie, Server (EGPCS).
INFO_LICENSE: Displays the PHP License.
INFO_ALL: Returns all available information (you can accomplish the same thing by using no parameters).
One way to use the phpinfo() function is by creating a phpinfo page, as we’ll describe later in this post. However, it’s important to note that you can find some of the information above without the extra trouble of using that function.
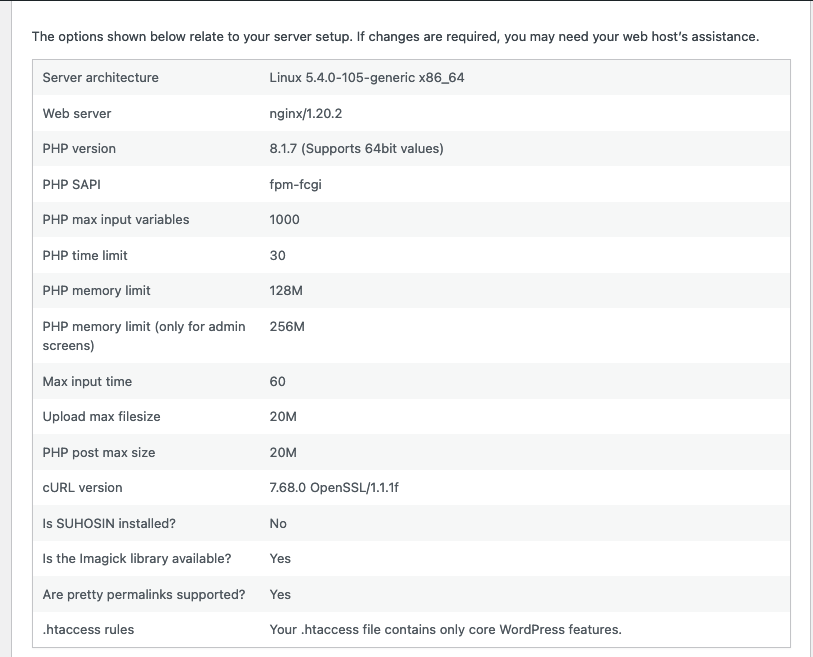
For example, the WordPress Site Health feature included in version 5.2 and above can share details about your web server, PHP version, memory limit, and more. Simply navigate to Tools > Site Health > Info > Server to find this data:
Rather than checking for these pieces of information, phpinfo() is more suited to assist you with debugging attempts. The EGPCS data available via this function makes it particularly helpful in that regard.
Suggested reading: How to Improve PHP Memory Limit in WordPress.
How to Create a phpinfo Page (In 3 Steps):
If you have a basic understanding of File Transfer Protocol (FTP) and how to use an FTP client, creating a phpinfo page is really quite simple. In the following sections, we’ve broken it down into three short steps.
Step 1: Create a phpinfo.php File and Upload It to Your Server
To start creating this page, open up your preferred text editor. In a new document, add the following line of code:
<?php
phpinfo();
?>
If you wish to use one of the parameters mentioned above, you should insert it between the parentheses here. Then, save the file as “phpinfo.php”. If you prefer, you can use a different name (we’ll explain why you might want to do so in Step 3), but you must use the .php extension.
Next, open up FileZilla or another FTP client, and connect to your site’s server using your FTP credentials. Then, upload your new phpinfo.php file to the public_html folder.
You’ve now successfully added the phpinfo page to your site. In order to view the page, however, you’ll need to know where to find it.
Step 2: Access the phpinfo Page in Your Browser
Once it’s uploaded to your server, your phpinfo page will become publicly available. This means you (and anyone else) can view it in a browser by appending /phpinfo.php to the end of your site’s domain:
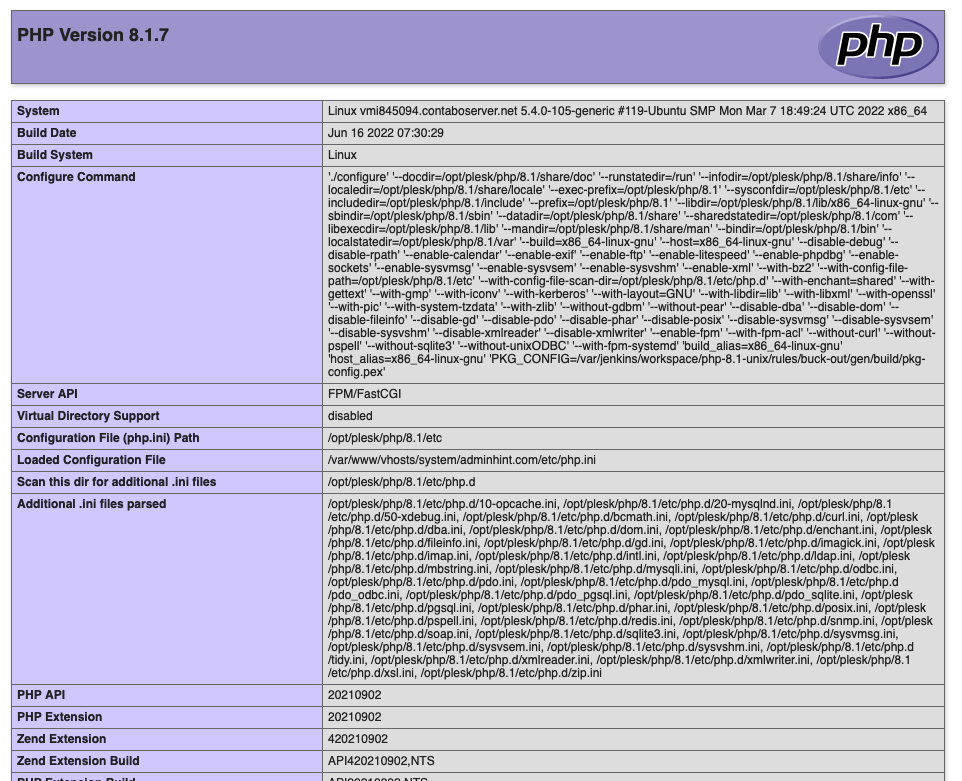
If you didn’t use any parameters and chose to return all of your PHP information, this page will likely be quite long. You can locate the specific details you’re looking for by using the Find function (CTRL or CMD + F) on your computer.
Alternatively, some users choose to rename their phpinfo page to help hide it from hackers. You might use a random string of letters and numbers, for example, instead of “phpinfo”. Note that this will change the URL you use to access your phpinfo page as well.
This means that you’ll need to remember the name you assign to your phpinfo page so you can reach it whenever you like. However, this isn’t a guaranteed solution for preventing a security breach, so it’s best to simply create the page when needed and then delete it.
Summary
The phpinfo() function can provide valuable information for debugging your site. An easy way to put it to good use is to create a phpinfo page, so you can easily view all of your PHP information in your browser.
It takes just three simple steps to create and use this page safely:
- Create your phpinfo.php file and upload it to your server via FTP.
- Access your phpinfo page via your browser.
Find Us on Socials